Saturday, July 14, 2012

Unset Jam... Runny Jelly...?

I may seem like a pro, but even my jams/jellies don't always turn out perfect. There are times when I get syrup when I was going for a lovely gel set. There is a way to save your hard work, and get that jelly to still set. Even after you've already sealed your jars.


The bad news is, you have to unseal the jars now. UGH!

So here's the secrets to the rescue...

First measure out your jam/jelly after you've opened the jars. You are going to want to do this in batches no more then 6 cups. Jam/Jelly was never meant to be done in large batches. Doubling a recipe is what may have caused the trouble in the first place.

Once you have your batch ready and standing by in a pot on the stove, turn the heat up to medium-high and get out a second pot to place on another burner.

Here you need the following for the new small pot:

1/4 cup of water per quart of unset jelly
2 Tbsp lemon juice
2 Tsp of powdered pectin
1/4 cup of sugar

Heat the water to boiling w/ the lemon juice and pectin. After 45 seconds at a boil, add the sugar. Give that another 45 seconds to activate the pectin. Dip a spoon in and make sure the liquid is coating the spoon and creating a 'sheet' as it drips off. This is NOT a steady stream of liquid, but more like a curtain.

Now add it to your 'oops' batch of jelly and bring that to a rolling boil for one minute. Test this batch with the spoon method as well. If you need to give it another 30 seconds go for it!

That should do the trick, works for me everytime.

Monday, July 2, 2012

Gardening For Chickens

Freshly harvested Sunflower heads ready to be dried for storage.


When I plan out my garden each season, I plan it according to my family's needs, things I want to experiment with and what my chickens would like. Though I toss them a fresh tomato or strawberries while harvesting for my fridge, I also have to think about what I can preserve for them come the fall and winter months.

While the ideas spin around in my head I have to keep in mind foods that store well with little processing and are safe for the chickens to consume. Though potatoes store well, raw potatoes are not good for chickens. Rice works great, but I'd have to plant a lot to get a little and I'd have to cook it before I fed it them.

My favorite options end up being very simple. Sunflowers are easy to plant and plentiful. I get the added bonus of beautiful flowers in the garden that attract beneficial insects and birds through out the summer. They're easy to harvest because I just cut the head off the stock after they've bent over and started to brown. You can seed the seeds in the head of the sunflower becoming plump as it grows, so you'll know when its ready. You'll need to find a warm place with good ventilation to allow them to dry for a couple weeks before you can put them up. The only real trick is getting the heads before the birds devour all the seeds.

Another good one we like to do is corn. We plant so much that we allow some of the ears to dry right on the stock. We'll then shuck them clean when the kernels are hard and store them in the house until winter. You also have the option that corn on the cob freezes well. Simply shuck and clean the corn and store in the freezer in gallon storage bags. Thaw them completely before giving to your chickens. I don't have the space in my freezer to store extra food for the chickens like that, it's already super stocked for the winter for us.

There are LOTS of great options out there for your chickens to get their portion of your garden all year long. As you see, you can freeze, dry, cure or can almost anything you'd eat for them too. So clear a little plot in your garden for some great produce you can share with your feathered friends.

Tuesday, June 26, 2012

Predator Attack

Last week turned out to be a rough beginning to the Summer season. We had an attack that ended up killing 2 pekin ducks and maiming a 3rd. our dear Ms. Lily who's not 3 years old lost a good amount of her neck, skin and muscle tissue too. Somehow she fought her attacker and escaped with her life, but just barely.

I'm been giving her extra daily attention, regularly cleanings and treatments with SWAT and Blu-kote I have to keep antibiotics in her water, along with some serious vitamins (Nutri-Drench) until she's back to eating and moving more on her own.

Last night she took a bath, and showed a lot of energy she's been lacking for a week now. I think we can finally say we're out of the critical condition phase of things.


Tuesday, May 29, 2012

Spring Round Up!

First of all, please forgive me!? It's been an overwhelming spring, lots of projects and lots of sick. In fact I was sick all of April and 1/2 of May! The time in-between I managed, with lots of help from my husband, to get the final gardens in and rolling. We added over 700 sq ft of new garden space this year... with tilling, compost moving and planting... there went most of my spring!

So I wanted to show off some of what we've accomplished and what we are now enjoying from our hard work. Hopefully my next round of posts will be more canning posts and recipes I'll be trying with all the yummy stuff rolling in.

Here are the blue mop head hydrangeas in bloom

The lavender lace cap hydrangeas are now opening up

Our meat bird project birds, 4 Cornish x & 1 Pekin duck. 7 Weeks old.

The deck bed in bloom

The larger of the 2 veggie gardens

Green bean tee pees filling out, already have green beans on them (Blue Lake Pole)

Rows of corn, sunflowers, squash and tomatoes

The grape vine has a good amount of grapes this year

Already picked our first raspberries this week, 100's more to ripen soon

Need to refinish the paths in the small garden, by herbs, carrots, garlic, cukes and tomatoes are going now

Random sunflower popper up in a rock pile. Daughter won't let me pull it out!

Harvested the potatoes today, got 17lbs of red & yukon gold

She's so proud of that green bean tee pee she fits in perfectly!

Well that is all I have today, but I will be back soon... hopefully I will have some advice, or a cool project by then. For now... over and out!

Tuesday, April 10, 2012

Getting a Better Germination Rate - Corn


Now we just love corn! Sweet corn, popcorn, indian corn... and we switch out which we grow each season. (This is to stop possible cross pollination which can wreck the flavor in your crop.)

If you haven't noticed, corn seed is very hard... like little yellow rocks. In years past we've planted the corn and occasionally went too long in between waterings during the germination period. This caused a few issues. The seeds need to remain moist during this time and missing waterings or watering unevenly had the seeds sprouting at different rates in one series of rows. Example; we'd plant 30 seeds in 3 rows of 10, uneven watering left 10 out 30 stalks 2 weeks immature and perhaps 5 or 6 seeds never germinated. This does make a difference on harvesting since they depend on one another to wind pollinate within those rows. Less stalks come to age at the same time, so pollination rates diminish as well.

So now you see the problem! Now, for the solution.

Soak your corn seeds before planting. Just place what you plan on planting into a cup of room temperature water and allow to soak 12 to 48 hours before planting. The corn will double in volume and be soft to the touch full of water. This will help start germination quickly and you'll notice your sprouts all come up right on time.

This year we've already planted 2 groups of 3 rows 2 weeks apart each. We've had 100% germination and all corn broke ground within a week and within 24 hours of each other. This will make for great timing on pollination and we should have many consecutive harvests the whole summer doing it in this manner.


Wednesday, March 14, 2012

What to do with a broken pot? (project)


So while transplanting all my house plants back into their outdoor porch pots, I picked up one of my favorite glazed clay pots to find it split in 2. It was an almost perfect split! Now, usually during a situation like this I find myself searching pinterest or google for ideas for broken pots. I've done mosaics, tiled tables, buried them... I even could have gorilla glued this along the seam and it would have been good enough to use a couple more years. No chips or broken pieces... a perfect split I tell ya!!!

I just HAPPEN to look over at my plaster end tables next to my bench that were about to be spring cleaned for the season and thought, well now.... I could REALLY bump up the end tables by planting them too. So I got to work turning my end tables into multi-use planters.


Step 1. - CLEAN everything. We're using adhesive here, and the surface needs to be spotless, dirtless and dustless.

Step 2. Rough up the area on the tables you need the pot to adhere to. Make some grip for your adhesive. Try a low grit sandpaper.

Step 3. Adhesive! In this situation your basic glue, hot glue or caulk won't work. "Water tight" is not ok. If water and dirt pool inside the pot caulk will warp and eventually release your pretty pot. Seeing the pot is clay and the table I have plaster... I went with a cement adhesive/fixer and expandable sealant. This is meant for brick, driveways, stairs... things that are going to get weathered regularly and it will hold even with pooling water for years. Check out the pic for the one I found, Home Depot has it in their cement/mortar aisle for about $6. Make sure to add a thick amount to all the areas that tough. The more the merrier with this stuff!


Step 4. Allow to cure! The can says 6 hours for basic sure... 10 days for FULL cure. I gave it 24 hours before I stood them up. Then 2 more days before I went on to the next step.


Step 5. Time to fill. As you see, my perfect crack was kinda wavy so they don't sit flat. I was going to fill with the adhesive on the sides, but thought better of that. The soil would slip fall out the bottom. So what to do to keep soil retention, and still allow drainage? Metal hanging pot liners!  I just HAPPEN to have a bunch of old ones needing to be replaced so I took 1 out of a long basket, cut it in half and used this to line the pots before adding the soil. Walla!


Step 6. Fill your planter tables! I chose a long growing ground cover vine called Vera. It will spill over the pot to the base of the porch and not grow up so the top of the table is clear to put things on.

So now you have a broken planter idea that is pretty budget friendly. This should work with wood tables as well, but you may have to experiment with the adhesive you use. My original plant with these was to use grout, but they didn't have it in a tube (it is out there though!) so I had to come up with a second idea on the fly.


Enjoy!

Monday, March 12, 2012

The Importance of Mulch


Well, I've said it before and I think I'll take this opportunity to say it again!

MULCH! MULCH! MULCH!

It's not that 'little' extra... its absolutely VITAL! Not only does it help with water retention at the root of your plant like most people mention... no no... it does SO much more. Gimme a minute to sell you on it.

Before we talk about types and costs... let me explain simply all the whys. This way you'll be ready to run out and get all the mulch you need ASAP.

1.) Water Retention - Like stated above, save yourself some time having to water again and again. Mulching will help hold water in the dirt longer.

2.) Root Shading - Some plants may be hot season plants and enjoy 80 degree weather on their tops, but their roots sure do need some shade from scorching. Some plants are so tender in that sense they couldn't survive without root mulching or at least base planted grasses and such to protect their root, like clematis.

3.) Disease protection - Many diseases that attack your plants come directly from the dirt they live in. Many fungi and bacteria thrive in the dirt, maybe even working in harmony with the roots... but if allowed to get airborne or simply splash up during a heavy rain and get on your plants leaves; well... all H#7% can break loose. Example: Blight

4.) Weed Control - It may not keep ALL weeds out of your precious beds, but it could cut your weeding down significantly. I've seen more then a 80% reduction in the amount of weeds in my veggie beds by simply mulching every season. My back thanks me!

5.) Permanent Paths - So not only IN the garden, but around the garden. You don't want to step on your plants or too close as you can damage the unseen roots, as well as cause soil compaction. This pushes the vital amounts of air in the soil out that the plants need to thrive. So mulch out your walkways so they are easy to stay on, also keeping weeds out of those paths so less need to mow and cause even more compaction and stress on the ground around your growing area.


You know whats sad? I could go ON and ON and ON about how great MULCH is... but I'll take a minute to give you some mulch options... because shoot... it can pretty much be WHATEVER you think of or have on hand at the time. So add to the list!

(I've labeled these with $ as cheapest(or free) $$ mid price $$$ expensive)

Options:

Wood mulch $$$
Grass clipping $ (make sure it was before the grass went to seed)
Hay or straw $$
Gravel $$$
Shredded News Paper $
Pine Straw $$
Compost $
Weed Fabric $$$

So, you see where I'm going with all this? This Mulching thing; total amazing! So scream it from the mountain tops... share this with a friend... and don't forget, whatever you are growing, whatever you are planning for your garden.... JUST MULCH IT!!!


Friday, March 2, 2012

Salmon Faverolles Move In


Introducing Gabby and Cherry, 2 Salmon Favorelle Hens we got at auction a couple weeks ago. One is obviously more red then she should be, so DD calls her the "CHERRY ONE!". They had their beaks clipped and have a hard time eating... but they are royally spoiled with deep dishes and lots of treats. They are skittish of people so were probably never handled much, but I cuddle them when I catch them so eventually they'll accept us.

For anyone looking to introduce more birds to their flock, its important you keep new birds quarentined for at least 30 days. You don't want disease spreading, or mites or anything that may cause stress of an uproar in your flocks health and sanity. Also give new birds a good look over. I found these guys had ticks and mites. I washed them, picked the ticks, dusted with DE(Diatomaceous Earth) and added used vaseline on their legs since they looks dried and scaly. I didn't see mites on their legs, but you can never be too careful. They are in their own coop, and though they can see my other birds... no one is touching and getting aggressive. Just the way we like it around here. :)
 

Thursday, March 1, 2012

Getting to work - Spring is coming!

Well, reality is the work is never done... you really just get 'caught up' and then you eventually fall behind. There is no in-between. You get a winter break which is only a few weeks here. However, you're fidgety the entire time you're supposed to be relaxing, so what does it matter, right?

So with a gorgeous day, felt like 80 out with a cool breeze (if you call 20 mph winds a breeze) I took a few hours to plan a plant rescue and finish up the garden that was tilled up to be prepared when the corn can go in. (That still almost 2 months away, but I'm just so darn fidgety!)

First the rescue of the rose-

My mother bought this rose many years ago, Jackson Perkins I do believe. I think its a Henry Fonda Tea rose?! It was never in a proper bed and it was at the top of a hill in front of their house so daddy just couldn't manage to steer the riding mower around it. Several years ago he gave up and just mowed right over it. After awhile we just forgot it was ever there. Last year the yard became a weed jungle when the mower died, low and behold the roses emerged and dainty yellow buds graced the front yard scene. I decided to swoop in and get it transplanted here and give it a garden bed of its own. It will never have to fear the blades of a mower again.

First nightmare... get the crown and as much of the root ball out of the ground as I could. Found out the roses was originally mulched with ROCK! Can you say my wrist is killing me right now. So after 30-45 minutes of fighting with the tangled mess of root, grass, weeds and rock I finally got it free. It was about 3 ft tall with some diseased growth, so I immediately pruned it down as much as I could without destroying the new growth. I was a little late getting to it because of this mild winter we've had. 


From here I dusted the root ball with rooting hormone which will help root growth. I've add some bone meal to the potting soil and decided to pot it up for not. The front bed isn't ready and I'd really like to baby it and make sure she'll survive before I give her the place of honor in my new expanded front yard garden bed. I'm sure it was well worth the afternoon struggles. 


And when I thought I had no energy left in my body, I finished raking out the rows for the corn getting 2 more done today. So we now have 7 finished rows for the sweet corn. The one I bought over 200 seeds for! YIKES! We also decided after some time on 'pinterest' I would create 2 bamboo teepees for my daughter to use as play space in the garden. Those will go where you see the round mounds.

And just when I thought I had done more then my fair share for the day, I checked my brussel sprouts which are as done as they are going to be. I planted these last March, even though I took some for the holiday meal I took the last of them today. I only had 6 plants, when 2 never produced any, so I'm satisfied. 


These are now in the oven roasting with some olive oil, balsamic vinegar, salt, pepper and garlic. Come on dinner!

Wednesday, February 29, 2012

Regrowing Celery

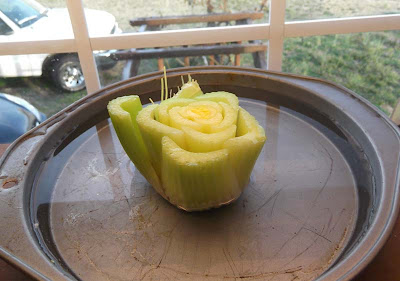
If you're a pinterest.com addict like I am, you've seen this project pop up a lot lately! Cutting the base of your store bought celery off and growing a whole new bunch of stocks from it. So I gave it and decided to give it a go.

Right now its day one! I've cut the base of the stock and have put it in a shallow cake pan full of warm water in front of an east facing window.

Here's day one picture. We'll check back on it within 7 days.


Sunday, February 26, 2012

Great Gardening Class

I had a fabulous group of ladies this weekend over for a beginner's gardening class. (Thank you ladies!) I really hope I covered enough to get them really excited and get them out in their yards! Definitely didn't want to over whelm anyone into quitting such a wonderful hobby. I think I gained a lot from the class as well, in fact I learned just how far I've come over the years and how I started from nothing, with lots of questions and anxiety!

So I just wanted to share a little flashback of what was, and what is.... for one day you will see, what will be!


Now all that green you see is covered with productive gardens and lots of flowers and trees. Makes a woman smile about how far her own 2 hands can get her. (With a little help from a really handy husband! Hehehe)

Wednesday, February 15, 2012

Prepping the new beds - Flowers & Corn!


I decided its best we get the ground tilled in when I want to plant the corn this year. My neighbor was kind enough to let us borrow the tiller and my husband decided to till everything in sight (I'm pretty literal on that one!).

So we have a 20'+ by 12' bed tilled in the backyard for the corn, then he decided to till around the raised beds so I could create paths there but then the bed in the front yard I keep my shrubs and flowers in looked awful small. So he added a 32' x 6' bed addition to the front of the house. Now I have my work cut out filling those beds.

I'll be spending the next month deciding on new plants for the front, and which plants and bulbs from around the house can be moved to the front. I've already got my sweet corn choice for this year, so that's good to go!


Sunday, February 5, 2012

Lavender Vanilla French Eclairs


Ingredients:

  Pastry Shell:
  1 Cup + 1 Tbsp Water
  1/4 tsp salt
  7 Tbsp Butter cut up
  1 Cup (minus 1 Tbsp) Sifted flour
  4 Beaten Eggs

  Chocolate Cream Filling:
  2 Cups + 2 Tbsp Milk
  1/4 cup + 1 Tbsp Sugar
  4 Egg Yolks
  1 Tsp Cocoa powder
  1/2 tsp Vanilla Extract
  2 Tbsp Flour Sifted

  Fondant/ Chocolate Glaze:
  6 oz Melted Chocolate chips
  2 Tbsp Melted Butter
  1/4 cup powdered sugar
  2 Tbsp Water

Preheat oven 410 degrees

Shell Pastry:
* In a saucepan boil water & salt. Add butter in cubed pieces. When melted pour all flour in at one time, reduce heat to med.
*Combine with wooden spoon until all flour is absorbed and remove from heat.
*Allow to cool and slowly add eggs (these should be prebeaten and at room temp). Adding 1/2 the eggs at a time helps. When adding the second half of the eggs, I switched to a whisk, it helped a lot.
*Add pastry mix to pastry bag or zip lock bag with the end cut off. Pipe onto a baking sheet that's been greased or parchment paper. (I use a silicone baking sheet.) Should make between 8-12 medium to small eclairs.
*Place in oven and bake 30 minutes without opening door.
*Remove and poke holes on both end of the eclairs with a toothpick. This allows the steam to escape so they don't get mushy inside.

Pastry Cream Filling:
*Mix Yolks, sugar, vanilla and flour in a medium bowl.
*Warm the milk and cocoa in a small sauce pan until you see some steam come off the milk. Do this on med-low heat slowly.
*pour milk over yolk mixture, stir to combine and the pour back into sauce pan.
*Bring to a soft bowl where you'll see bubbles popping up the side of your sauce pan. After a few pops give it an easy stir and remove from heat. It will thicken more as it cools.
*When cool, cut tops off of eclairs and fill with the cream and place the tops back on them.

Chocolate Glaze:
*Combine water and powdered sugar to dissolve and set aside.
*In another bowl combine chocolate chips and butter. Put in microwave for 1 minute, stopping every 15 second to stir until melted.
*Add the dissolved sugar to the chocolate and mix until combined.
*Use to frost the top of the eclairs and allow to cool on counter or in fridge before serving.

Thursday, January 26, 2012

Planning the west side


Well, the west side of my home's yard is nearly bare. My challanges have been that this side of the house gets only late day light, as well as all the home's wiring and pipes come into the house here. This leave it near impossible to know how deep is safe to dig. So I haven't touched it. I can't get close to the house either for fear of hitting the obvious wires coming out of the ground. Today, I played with some photos and came up with a plan for privacy, won't have to touch along side the house and will give the west side of the house its very own special touches. I know its rough looking, but it was a quick play around in photoshop.

I'm going to see what my husband thinks, chose the varieties of shrubs and flowers and price everything before its a decision. Fencing is just NOT an affordable or attractive option to me. Just thought I'd share the rough draft. The only for sure will be a Hydrangea I rooted last year that I needed to find a spot for. Its small now, but in a few years it will be a great size, and needs a place of honor!
Before/Now:

Monday, January 16, 2012

I'm such a sucker for FUZZY!

Took the daughter to our first livestock auction yesterday. Picked up some more silkie chickens, and had my heart set on filling up another coop with some new standard size hens.

Instead I was tricked by the kids and fell in love with little Mini Rex Rabbits instead. We bought both, but immediately found another home for the little girl since it turned out they were a pair. We weren't looking to have more baby bunnies though, so we kept the male and the little one named him Mr. Oreo!


Thursday, January 12, 2012

Bitter Sweet Marmalade


I don't know about you, but either marmalade is TOO bitter for me, or TOO sweet. A good balance is what my palette prefers. So in messing around over the years (and multiple failures) I finally got a good set, good flavor orange marmalade. The secret.... TANGERINES!

So first you get the following to balance the flavor.

1 Naval Orange (Bitter, but juicy so only 1. If you perfect not bitter do all Cece or Valencia Oranges for this.)
3 Cece Oranges
3 Tangerines
6 Cup Sugar

Slice all SUPER thin and seed.

Added Slices and Juices into a pot w/ 8 cups of water. Bring to a rolling boil for 8-10 minutes. Remove from heat and add 6 cups of sugar. Stir until dissolved and cover. Allow to sit overnight or at least 12 hours.


Next day place back on heat, bring to a boil then reduce heat to medium low and let simmer for 2 hours.

Bring back to a boil and reduce to medium to medium high heat. You need 20-30 minutes on the stove and do not temp get over 220 degrees (use a candy thermometer for this).


When temp has held for at least a minute, check your marmalade for sheeting on a spoon. If you don't know what this is or how to check that, simply put a little plate in the freezer and drink a few drops of the marmalade on the cold plate. You want the marmalade to stiffen, push with your finger and look for the top of the drop to ripple or have a skim on top that is gel like. If it gets really hard quickly, stir in a cup of water to the mixture or your marmalade will be too hard. If its still syrupy/runny double check its at 220 and then cook for another 2-4 minutes and check again until it sets.

Ladle into sterilized jars, place lids on top and waterbath for 10 minutes to seal your jars.


Enjoy!